This week I over heard a little girl telling a friend to please play with her because if she didn't then she would be all alone and she did not want to be all alone. I smiled at the innocence of her statement. Then I realized how many of us are just like this little girl? We want others to surround us a large part of our lives.
I confronted this feeling of being alone when I moved away from Laramie to a new town where I knew a few people. It was so exciting to be moving away to a new place I didn't realize I would be starting over. I had made a lot of great friends in Laramie.
You take for granted those friendships when they are right in front of you. You never really appreciated walking into a store and seeing at least 5 people you knew. Now you walk into a store and never see a single person you know and this happens to you all summer. You just do not know anyone. You are alone.
I would long for the friendships I had left behind and wonder if I even mattered anymore. Much like this little girl, I measured my worth by having somone to "play" with. I finally was confronted with this thought 2 days ago and I realized I am NEVER alone!
I call these moments my coconut moments. It is when an invisible coconut falls out of the sky and hits me in the head. I realized that God is always with me. He may not be visible as a human form to me at this point in time, but He is with me. Hebrews 13:5-6 tells that God will never leave us, nor will He forsake us.
We may feel forsaken or left behind by man, but God will be our comfort at all times. He is the best friend we can ask for.
The hardest part about growing up is leaving behind friendships. Even though they are never over, they are never the same. Our relationship with God is consistant though. We can never leave behind our friendship with God through moving from one place to another. He is with us, helping us have the strength to get out of bed every day, go grocery shopping alone, take walks alone, and just be alone in general.
I don't know about anyone else, but I have grown so much from my time alone in Sioux Falls. It has been a great experience to learn to rely on God being my friend when I felt so alone. I rejoice for the friendships God has brought into my life to help grow my walk with Him. I also rejoice in the time I spent alone with Him this summer. It was a great time to focus on the love God displays for me and my family.
One little girl's words will always ring loudly in my heart. I was able to work through being alone. God was able to work on my heart and change me from seeing my being alone as a burden or an avenue for depression, but instead a time to rest in His friendship and love.
Friday, October 5, 2012
Monday, July 30, 2012
Diapers...Cloth diapers!
So, I was sitting in the Wal-Mart parking lot bracing myself to go inside to buy Hannah a box of diapers. Then it hit me...why do I do this to myself every month? A lot of people are going to cloth diapers. I wanted to do cloth diapers for quite some time and now figure here is my chance. Nothing is stopping me!
I went into the store and bought:
2 yards of plain turquoise flannel (it was on sale for $2 a yard)
1/2 yard of 2 really cute patterns of flannel (each cost $3.47 a yard)
3/4 in X 1 yd. sew on Velcro for $.84 each (I bought 2)
3/8 in X 6 yards elastic at a dollar something each (I bought 2)
A pack of 18 washclothes for $4.00 (These are on sale now because it is college time and they are trying to get college students to buy these.
All of this cost me under $19.00 which I would have spent on a box of disposable diapers for this pay period.
I did not have to buy thread since I had some at home. I also have a Singer sewing machine. If you had to buy these two things your prices would differ from mine.
I came home a got right down to business. I used this website to http://mayna.livejournal.com/198548.html get me started and adjusted it some.
First you must make a pattern for the diapers. I traced a diaper that currently fits my daughter. I made this pattern a couple times and revamped it. Remember you will most likely not get it completely right the first time. I finally made this pattern and it worked for my daughter.
I taped 3 pieces of white copy paper together and traced this pattern. I found you need to make the top wings a little longer then what you think because disposable diapers can stretch really far while cloth does not. Think about your child's legs and hips as you are making the pattern.
I have the pattern made and now need to cut out the fabric for the diapers. I suggest using something softer for your baby's bottom. I like using flannel because it is soft. I am using all the same colors for this diaper, but you can mix and match as needed.
I am not a great pinner and then cut. I am much better with tracing the pattern directly onto the fabric. Do what works best for you though. Make sure when cutting the fabric is folded so you are cutting out two pieces at once instead of just one at a time. These 2 first pieces will be the outside which will be seen and the other 2 will be the inside that cannot be seen. I am only using the same flannel for both the inside and outside because I ran out of my ugly flannel to go on the inside. Pick a flannel or material to go on the inside that is not your favorite because it will never be seen!
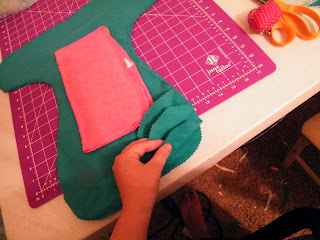
After you have gotten your 4 diaper pieces cut out, take a wash cloth and fold it in half. You can also use fabric pieces instead of a washcloth. It must be in a rectangle shape though! I also laid a few scrapes of material inside the washcloth before folding it in half to give it more soaking power.
You then place the soak pad (washcloth) in the middle an inside diaper piece. This is the piece that will not be seen by anyone. I made sure to pin the washcloth to the piece that has the pen marks on it. Make sure it is centered the best you can. Pin it in place to keep it from moving. Then sew it all the way around with a straight stitch. Make sure you sew backwards when you begin sewing and at the end of your stitch to keep the stitches from coming out.
This is what it looks like sewed to the diaper.
Okay, here comes the hard part since I am using all one color.
You will now begin layering your diaper to sew together.
On the table, lay one of our inside pieces that no one will see. On top of that lay a seen piece with the pattern you want on the outside facing up. Then lay the other seen piece on top of the other seen piece with the pattern you want seen facing each other. Then you lay the inside piece that has the washcloth sew it on the top with the washcloth facing upwards.
See how I have four layers? The point when you sew it and turn it inside out, the cute patterns you picked for the outside will be seen and the washcloth will be hidden. If you are still confused by this step, please see other blog as well. It may help! :-)
Now pin together the four pieces. You are going to sew around the edges with a straight stitch, but leave the bottom( the rounded bottom without the wings) open so that you can turn it inside out. Try to sew as close to the edge as possible on the wings so they maintain their shape.
See how I have the pins holding the bottom together? I did not sew here yet. After you are done sewing this together, you need to go around the edges and cut off the extra material being careful not to cut a hole in the fabric or cut your stitches.

Take your elastic and along the top figure out how much bunching you want. I usually just guess and do not measure.
Place your thumb on one end of the elastic and take your other hand and stretch the elastic as far as it will go. You will need to mark the spot where you want the elastic to stop and start. Using a zig zag stitch, hold down the elastic and stretch it as you are sewing so the diaper will bunch correctly. My best advice is sew a few stitches so that when you stretch the elastic it will not come out and be anchored when you begin to stretch.
It should look like this! Do not feel bad if you do not get it the first time. I has a hard time get it right the first time I did this.
Now, fold your diaper in half to figure out where the legs will be. You will then mark on both sides where the legs begin and end. Match up your elastic to these marks by taking one end of the elastic and stretching it to the next mark. I suggest doing this before cutting it so that way you won't waste any. Then sew it to the diaper, stretching it as you sew.
Do this on both legs.
This what it should like when you get done.
Now turn the diaper inside out. Fold the bottom together and sew it together with a straight stitch.
This what it looks like all sewed up.
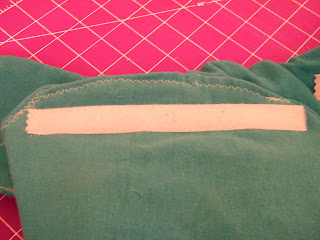
Now it is time to place the Velcro on the diaper. Fold the diaper so the bottom up like you are placing it on your baby. Pin Velcro all the way across the lip (or whatever you want to call it. Haha) and sew it into place with a zig zag stitch.
Cut and place Velcro on the wings now. These should be placed on the wings so that they match up with the Velcro on the lip of the bottom. Sew them on with a zig zag stitch.
And you are DONE! Simple huh?
Don't feel bad if you mess up or don't make them the right size at first. You will get the hang of it. I also made covers for the diapers with a shower curtain and cloth (stay tuned for that pattern!)
Diaper with cover!
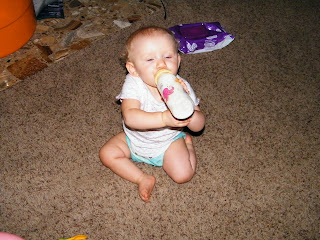
Baby in cloth diaper. She looks pretty excited about it! Haha
Wednesday, July 25, 2012
Losing weight...
Went and worked out this morning...I just wish I could lose weight by watching people exercise just like I gain 5 pounds just by looking at something not good for me to eat.
But today, I pushed through it and made it through my 30 minutes of cardio and my weight lifting routine. I even ate a salad for lunch. You just have to push through! It is hard but keep working and eating healthy and it will happen.
I love making smoothies in the morning to help crave off the morning graving.
I usually start with banana in the blender.
Put in some frozen peaches or strawberries.
Peanut butter.
Almond milk.
Blend until smooth.
This makes a huge cup full and I can make it all morning on this. You can also put nuts in it.
I love this smoothie. It is amazing!!!!
Tuesday, July 24, 2012
In the life of a stay at home mom!
Psalms 19:14 Let the words of my mouth, and the meditation of my heart, be acceptable in thy sight, O LORD, my strength, and my redeemer.
Life has certainly changed since my last blog. We have a beautiful baby girl, Hannah, who is about to turn 1 in August. We relocated to South Dakota and have been working hard to have a great life here. I start work in the Sioux Falls School District in less then a month and am so excited! It's only 4 hours a day which works great with my passions in life: God, my family, and my passion for my hobbies.
Andrew works so hard and I am so proud of him. He is amazing with Hannah.
Hannah is a happily, giggly baby. She loves Mac'N'Cheese, duckies, and playing with the printer. She is slightly spoiled, but that's okay. I know she will grow up to love God, respect others, work hard, and be a kind and generous person. Andrew and I will make sure of that.
We had to give McCoy away though to my cousin because he could not live in our apartment with us. He is settling quite nicely into his life with three other cats and a teenage girl that loves him.
I have found a wonderful church family here and am growing in my faith in God. I have been reading Loving God with All Your Mind by Elizabeth George. It is really helping me with my thoughts. I am starting to realize that if people do not say it, then I should not think they are thinking such things.
I have been cooking like a crazy person as well. I love Pinterest! I find so many great recipes there! I made this cake for my sister's birthday party:
This is the beginning of the next chapter in my life!
Subscribe to:
Comments (Atom)


